The Git and SourceTree beginner's guide to contributing to open-source projects in GitHub - Part 2 - Working in GitHub

Having gone through the basics of Git Vocabulary and workflow in part 1, let’s get done to business with GitHub.
Setting up the stage
For this tutorial, I’ll be using Concrete5's GitHub repo.
As explained in part 1 of this guide, you should already have your own GitHub account.
Well maintained repositories will usually offer a contributing guide with rules you’re expected to follow. Those rules are here to make the reviewers’ job easier and to ensure all code follows a common standard. I strongly suggest you read Concrete5's contributing guide.
Failure to follow the guide will probably get your pull request rejected.
First, ye shall fork thy chosen repository
In GitHub, navigate to the repository you want to fork and click on the top-right button labeled “Fork”.

When you hover that button, the help text says it all:
Fork your own copy of concrete5/concrete5 to your account
You are then given a choice of accounts that you own or for which you have the required permissions to add a repository.
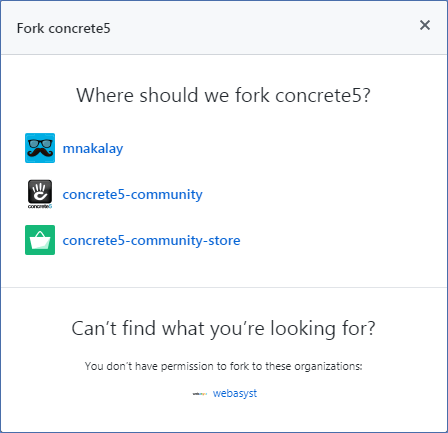
Click on one of your accounts and the repository will be forked there.
Once the repository is forked you can see very clearly:

- the name of your new repository
- that it is a fork
- which repository it is a fork of
If you remember, I explained in part 1 that only a single instance of a given repository can exist under the same account. To test that, go back to the Concrete5 repository and try to fork it again. You will see you cannot fork it a second time under the same account.
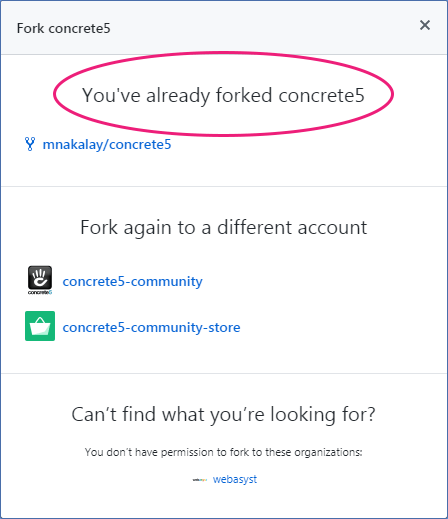
Working directly in GitHub
If your contribution is small and spans only a few lines of code and preferably only one file you may not even need to install anything. You can work directly in GitHub from your browser. You could also do it if you have more code to contribute but it’s just not that great of an experience.
The difference between working directly in Github and working on your computer using SourceTree is that, in GitHub, every file you change will have to be saved as one commit. With SourceTree modifications across multiple files can all be committed together with one comment. When several files are all modified as part of one distinct unit of work, you might not want to commit and have a commit message for each and every file.
Navigating from file to file will also be tenfolds easier in your editor of choice than in GitHub.
Working directly in GitHub should only be the preferred solution when your code is going to be so limited in scope that creating a whole new repo on your computer and doing the back and forth between local and remote is just not worth it.
But let’s see how to do it anyway.
Branching in GitHub
Now that you have your fork, you should create a branch and give it a meaningful name.
Be careful you have to select the proper existing branch to branch from. For Concrete5 (and many other repositories) you should branch from the “Develop” branch as explained in their contributing guide.
First, make sure you selected the proper branch from the “Branch” dropdown.
You will see a list of all existing branches for this repository.
You will also see a text box that allows you to either search or create a branch.
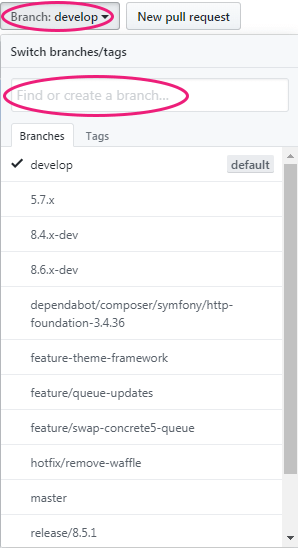
By typing the name for your new branch in that text box, GitHub will offer to create it if it doesn’t already exist. And yes, you guessed correctly, 2 branches cannot share the same name.
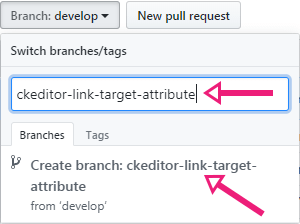
You can now click where it says “Create branch” and after a few seconds and a page refresh, your new branch will appear in the list.
Make sure you select that new branch before modifying any file.
Modifying a file and saving
You can now navigate to the file you want to modify by clicking on folder names one after the other until you reach your destination.
Once there, click on the right-hand button with a pen icon in the toolbar.
![]()
This will put the file in edit mode and you can start writing your code.
Although the editor will help you with that (it’s a smart editor) make sure you respect indentation.
Once you’re done editing, scroll to the bottom of the page and fill in the summary before saving your file and doing your first commit.
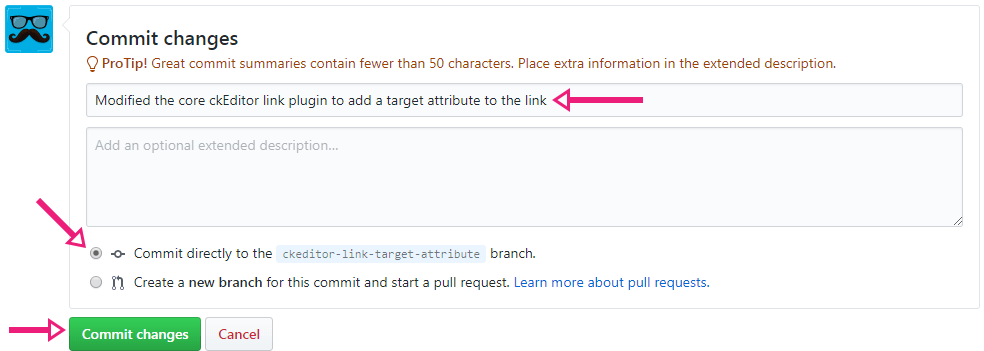
The first text box is the summary and it is required. The second, the extended description, is optional.
You should pay attention to the hints given, they are useful. In the screenshot above I am told that “great commit summaries contain fewer than 50 characters” and mine contains more than 80.
A better summary would have been “CKEditor link plugin: adding a target attribute.” I could have then added more details in the summary. Don’t make it excessively verbose but give a good description of:
- what you changed
- why you changed it, why it was necessary
- what the effect or result is going to be
You then select to commit directly to the branch you created in the previous step and commit your changes.
What’s next
In part 3 of this guide, we’ll be using SourceTree, our Git GUI of choice. You’ll see how it’s a better-suited solution for more important code submissions.


