8 easy ways to harden your concrete5 website's security right now

As far as web applications are concerned, concrete5 is a pretty secure piece of software. Still, it can’t do it all by default and some common-sense decisions are left entirely to you. Let’s see 8 easy but important ways to harden your concrete5 website security right away. No code involved 🍻!
What are those 8 easy tactics you ask?
Here they are, clickable for your easy-navigation pleasure ⛵:
- Use an SSL certificate, obviously!
- Change the default Admin username
- Tighten user access
- Enforce good password practices
- Tighten IP blacklisting
- Hide your concrete5 version number
- Do some cleanup
- Keep everything updated
1. Use an SSL certificate, obviously!
Allow me to be King 👑 of the Freaking Obvious here for a minute and at the same time to admit to a tiny little white lie.
As the KFO let me give you a piece of friendly advice: Use an SSL certificate! NOW!! Do It NOW!!!!!!!
If you don’t use an SSL certificate this is what will happen:
- Your users will be given a nasty warning by their browser saying your website is not safe and your business will look… meh
- Google and other search engines will flag your website as insecure and its ranking will drop
- Some payment providers like Stripe will not allow you to take payments from your website
- Your users’ data like password, credit card numbers and other bits of private info might get compromised
Now for the little white lie: I know I said no code involved in the intro and even toasted you about it… Well, there is a chance you might use a bit of code for this item and this item only. You won’t necessarily have to but you might. On the bright side, I’ll show you the code so all is forgiven, and thank you.
Generating and installing the SSL certificate
Getting an SSL certificate for your concrete5 website can be done in more than one way. They used to be a bit expensive but we now have access to free certificates. They have fewer bells and whistles but as far as security is concerned they’re as good as the paid ones.
To get a free SSL certificate for your website you can:
- Ask your hosting provider, many include SSL certificates with their hosting plans
- Generate and install it yourself using this awesome free concrete5 package by uber developer mlocati
If you have more specific needs and want to go the paid way you’ll find many providers. I Personally can only recommend Sectigo (formerly Komodo) as they’re the ones I used in the past and I can vouch for them. Please keep in mind that you’ll still have to install the certificate on your server so again I suggest you ask your hosting provider for help.
Setting up your server to use the SSL certificate
Once the certificate in on your server you have to force a redirection to the HTTPS (secured) version of your site instead of the HTTP (not secured) one.
You can either set up your server to do it through cPanel (easy) or use a .htaccess file (easy as well but requires the aforementioned little bit of code that you have preemptively forgiven me about 😇)
- Easily learn how to do it using cPanel watching this YouTube video or reading this article, both straight from the horse’s mouth.
- If you want (or must) go the .htaccess way, this article will teach you everything you need to know. Or just add the code below to your .htaccess file.
RewriteEngine On
RewriteCond %{SERVER_PORT} 80
RewriteRule ^(.*)$ https://www.yourdomain.com/$1 [R,L]
2. Change the default Admin username
By default concrete5's Admin (a.k.a. SuperUser) username is… “admin” 🤨. It’s pretty standard and the same goes for many web applications. That’s why it’s so unsafe.
Very simply, if hackers are going to try and brute-force your password knowing your username is “admin” that’s only one piece of information they need to figure out to break in.
With a different and unique username, you force them to figure out both your username and password. It’s much more challenging.
Keeping in mind that the SuperUser is your website’s almighty power that be, you really must protect it.
To change your SuperUser’s username, navigate to this page /dashboard/users/search/view/1 on your website. That’s the SuperUser’s profile page. If it doesn’t end with the number “1” it is not your SuperUser no matter what it’s called.

To change the username, click on the existing one, and in the popup that appears enter your new one and save.
Please don’t use something like “admin2” or “superuser”. Go for something harder to guess but still easy to remember.
3. Tighten user access
You should delete or disable all user accounts that are not used. Deleting them is better but if in doubt simply disable them.
Very often website owners are not aware of several leftover accounts that pose a potential threat. For instance, any account belonging to the “Administrators” User Group has access to almost everything on your website. Chances are whoever developed your website had one of those and it might still be active.
If you are not sure which accounts are needed and which can be removed, my suggestion is to check all accounts for the date of their last login and remove those who haven’t logged in for a long period of time.
If you only have a handful of user accounts just go at it manually, no need to follow the steps below.
If you have many or need to know more before you make a decision, follow along.
Figuring out which accounts to delete
First, navigate to your members’ page /dashboard/users/search. On that page, above the users’ list, click on the “Advanced” link inside the search box.
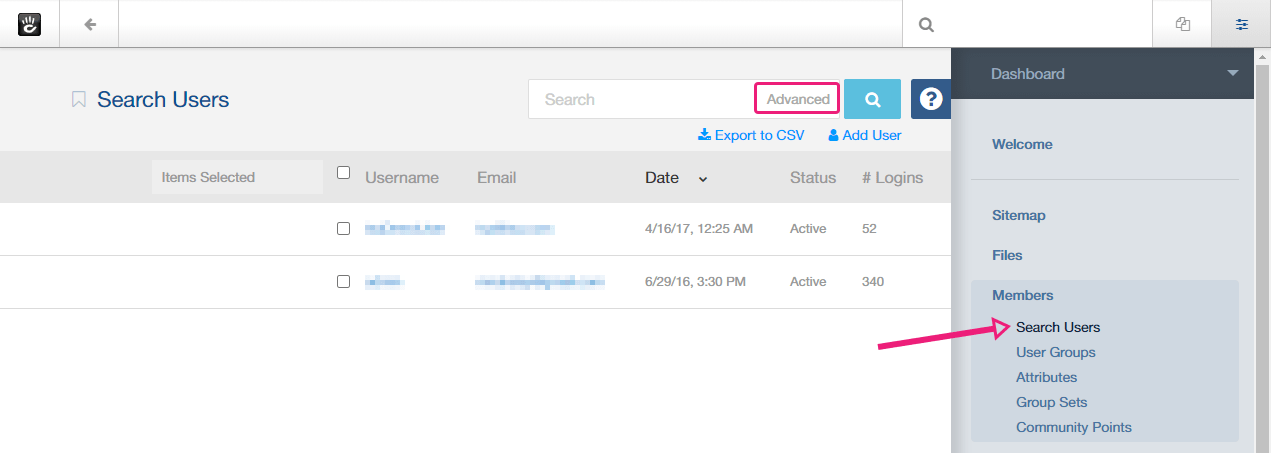
In the popup that opens, select the “Customize Results” tab and under “Choose Columns” and “Standard Properties“ start by checking both ”# Logins” and ”Last Login".

Then scroll down all the way to “Sort By” and make sure “Default Column“ is ”Last Login” and ”Direction“ is ”Ascending” to have users who didn’t log-in for the longest time at the top of the list.

Depending on how many users you have, you might also want to set the “Number of Results” to more than 10.
As explained above users belonging to the “Administrators” User Group have a good deal of power over your website. With that in mind, you can optionally filter your list to show only users from that group.
To do that go to the “Filters” tab and fill up your settings as in the screenshot below.

Then click on the “Search” button. You could save it as a preset but you’re probably not going to use it that often so you can just skip it.
Your list will reload and look like this, with the extra “Last Login” column and ordered by the oldest last login first.
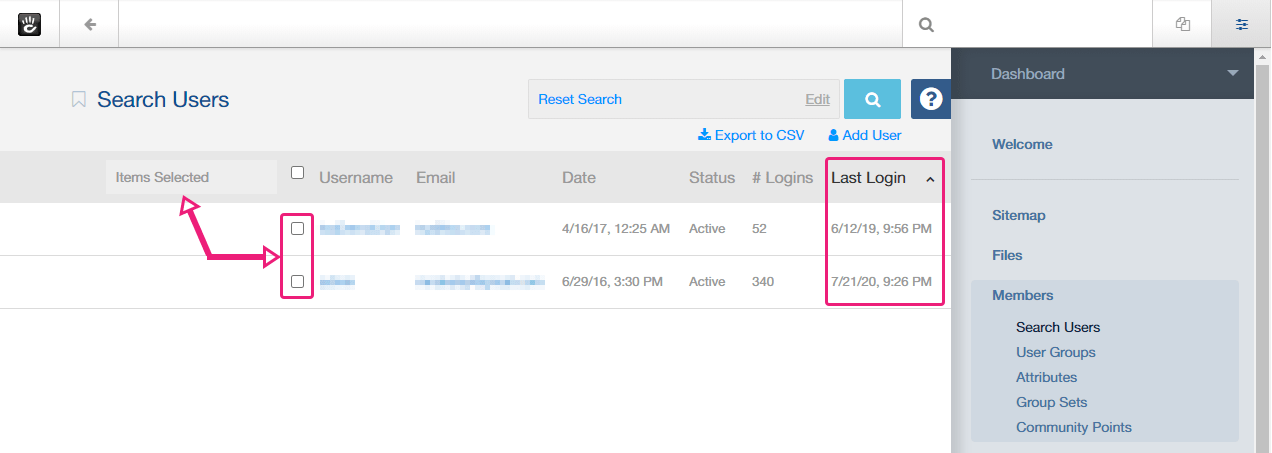
I suggest you look at both the number of logins (# Logins) and the date of last login.
Somebody who barely logs in and didn’t do it for a very long time can probably go.
Someone who used to log in often but has stopped for a while might be worth checking first. Unless you know they were hired hands not working for you anymore in which case they can be removed as well.
Deleting or disabling the selected accounts
To delete all the selected accounts at once, check the boxes next to each account and select “Delete” from the “Items Selected” dropdown.
To only disable them, select “Deactivate Users” from the “Items Selected” dropdown.
Again, if you’re sure then delete the accounts. If you have a doubt, chose to disable them instead although deleting is preferred for maximum safety.
4. Enforce good password practices
By default, concrete5 requires user accounts’ passwords to be between 5 and 128 characters long and that’s the only requirement there is.
If you don’t want your users to all log in with passwords like “123456” and “password” and then complain their account got compromised, it would be a good idea to enforce some password rules.
Once again concrete5 has your back and you can do that in a jiffy directly from the dashboard.
Navigate to your dashboard’s “Password Requirements” page /dashboard/system/registration/password_requirements. Alternatively, type “password” in your intelligent search box and you’ll get there.
That page is as self-explanatory as they come.

Most websites ask for at least 1 special character—!?;/*#+ for instance—and 1 uppercase character. Simply fill the form above and set your password requirements to your liking. Try to strike a good balance between security and not being a pain-in-the-neck to your users. Asking for 10 special characters for instance might be a bit overkill.
It would be good to also ask for at least 1 digit (0 to 9) so let’s do that using a regular expression.
Click on the “+ Add” button under “Custom Regular Expression Requirements”.

In the “Regular Expression” field enter /.*\d/
I strongly encourage you to enter a description as well even though it is optional. It is important because concrete5 will use that description to tell the user what is missing from their password. You can see an example in the screenshot below where concrete5 is showing the same description I used in the screenshot above.

5. Tighten IP blacklisting
Users visiting your website can be identified by their IP address, a unique set of numbers separated by dots like 127.0.0.1.
Concrete5 has a core defense mechanism that will blacklist users who have at least 5 failed login attempts in less than 5 minutes. They won’t be able to log in for 10 minutes if that happens. They will be identified and blacklisted by the IP address.
You can reach the IP blacklist setting page by navigating to /dashboard/system/permissions/blacklist or alternatively typing “IP blacklist” in your intelligent search box.

Tweak your settings to make sense for your use-case
You can tweak the system by modifying the number of login attempts allowed, the time span for these attempts, and the time span of the ban even making it forever if you wish.
To be able to make informed and sensible choices you have to understand a few basics.
First, there are users who will legitimately fail to log in because they barely remember their password and keep trying. They might not be aware of the IP ban.
Second, hackers trying to brute-force your password will use automated tools that will test dozen of passwords per minute.
Finally, those hackers are aware of IP blacklisting and will also use tools to spoof their IP address and use a different one each time or after each ban.
As a result, whatever settings you use probably won’t do much to stop a skilled hacker. They will, however, make life harder for dilettantes. They will also potentially make your legitimate users miserable.
If you have multiple legitimate registered users on your website, the only pieces of advice I’d give you here would be:
- Lower the number of failed login attempts to 3 instead of 5 as it is pretty standard (think ATM machine or the PIN number on your phone)
- Increase the ban time span to 30 minutes
- Don’t ban users forever
If you’re the only registered user on your website then by all means tighten the system as much as you want and ban forever. Just make sure you’re not one of those users who keep losing their passwords.
Go the extra—kind of extreme—step
There’s another possibility that’s not IP related but goes hand-in-hand with IP blacklisting.
Navigate to /dashboard/system/registration/deactivation and there you’ll be able to totally deactivate a user account after a number of failed logins within a certain time span. Same settings as IP blacklisting.
This is good if someone got their hands on a legitimate username and is trying to break in that specific account.
It is also a more efficient—albeit drastic—solution since once an account is disabled there’s nothing an attacker can do about it. Unlike with IP blacklisting where the attacker can change their IP address as explained above.
But of course, the legitimate owner of the account will have to contact you to have it reactivated. You might want to have a process in place to deal with that situation.
6. Hide your concrete5 version number
Most security-conscious web developers hide concrete5 version number in the website header—the “generator” tag. Remember the more you keep hackers guessing the better it is.
Still, I repeatedly see one common mistake that gives it all away.
And let’s be clear, for someone who knows concrete5 it is still quite easy to figure out your website is built upon it. Only the exact version number can be reliably hidden.
Removing the “generator” tag
Concrete5 adds a standard “generator” tag to your website’s header. It looks like this:
<meta name="generator" content="concrete5 - 8.5.2"> To hide concrete5's version number from your website header you can go the easy way and use the plugin Handyman. It is a remarkably useful and well-built application that should be required on all websites and to be honest it’s worth way more than the $15 asking price. It will let you control so many crucial aspects of your site that are not normally easy to set that your head will spin. In a good way.
You actually have a choice to hide concrete5's version number as well as the concrete5 name itself.
- If you choose to hide the name, the “generator” tag won’t be added at all so both name and version number will be hidden. This is what I recommend.
- If you decide to hide the version number only, the “generator” tag will still be added and its value will simply be “concrete5”
If you decide not to get Handyman and set your configuration manually instead, it is not very complicated.
On your server create the file application\config\concrete.php if it’s not already there.
In that file add the following (make the necessary modifications if your concrete5.php file already contains something):
<?php return [
    'misc' => [
        'generator_tag_display_in_header' => false,
        'app_version_display_in_header' => false,
    ],
];
You don’t actually need both “generator_tag_display_in_header” and “app_version_display_in_header” as explained above. If you have the first one set to false, the second one is not required.
Avoiding the mistake that gives it all away
As we’ll see in the 8th tip below, you should always keep concrete5 updated.
When you update concrete5, the new core will be added to your server in the folder updates\concrete5-x.x.x where x.x.x will be the current version number.
Concrete5 uses a set of JavaScript variables required for its normal operation and they are available in your website’s header. One of these variables is “CCM_IMAGE_PATH”.
That variable will contain, you guessed it, the path to your new core which contains your concrete5 version number. It will look like this:
var CCM_IMAGE_PATH = "/updates/concrete5-x.x.x/concrete/images"; Dealing with that is quite simple.
Simply rename the folder to remove the version number from it.
You must then modify the file application\config\update.php to modify the folder’s name there as well.
7. Do some cleanup
Any time you add a plugin to your website you open the door to a potential security risk. It is what it is and the same goes for any CMS.
Mitigating that risk is straightforward: remove all plugins you don’t use.
That has the added benefit of giving a little performance boost to your website.
Your first step should be to uninstall any concrete5 package you’re not using.
Packages are just one possibility though.
Additionally, uninstalling them is not always enough and it is best to completely remove them from your server after uninstalling them.
What you can look for and remove:
- Packages: on your server, they are inside your root “packages” folder
- Blocks: aside from blocks installed by packages, you can find blocks inside your
application\blocksfolder - Themes: themes not installed by packages can be found inside your
application\themesfolder
To uninstall packages, navigate to your dashboard page dashboard/extend or alternatively, type “package” in your intelligent search box and click on “Add Functionality”. From there you can uninstall any package which will also uninstall any linked block and theme.
To uninstall blocks that do not belong to any package, navigate to your dashboard page dashboard/blocks/types or alternatively, type “block types” in your intelligent search box. From there you can inspect and uninstall any block. Check if it is used on any page by clicking on it before uninstalling.
To uninstall themes not attached to any package, navigate to your dashboard page dashboard/pages/themes or alternatively, type “themes” in your intelligent search box. From there you can make sure the theme is not active and activate another theme if needed before uninstalling.
In any case, once uninstalled, make sure you delete the files from your server.
8. Keep everything updated
Hi there! It’s me again, the KFO👑. We met around tip #1 up there at the top.
I have another piece of friendly advice for you: Always keep your software updated! Always! Don’t be sloppy and do it!!!!!!
And by software, I mean concrete5 and all installed packages (if not installed just remove them as explained in tip #7 above).
When updating you make sure you benefit from any security fixes introduced in the new version.
That is also why I advised you to hide your concrete5 version number above in tip #6. Security issues in open source software quickly become common knowledge. Since they are specific to certain version numbers it is important to not advertise which you’re using and to quickly update as soon as a fix is available.
Connecting to the community
To ensure you are kept informed about updates to concrete5 and packages available from the marketplace, your first step is to connect to the community. Navigate to your dashboard page dashboard/extend/connect or alternatively, type “community” in your intelligent search box and click on “Connect to the Community”.
To find out what to do from there visit concrete5's documentation page about connecting to the community and watch the YouTube video on that page. It is for a much older version but the steps are still exactly the same.
Updating packages
Once connected, you will be informed on your dashboard any time there’s an update for any packages you’re using.
Navigate to your dashboard page dashboard/extend or alternatively, type “package” in your intelligent search box and click on “Add Functionality”. You will see this:

Simply click on the button “Update Add-Ons” and follow the process to update your packages.
Updating concrete5
Unfortunately, it seems the same is not working for concrete5 itself at the moment, and to check if a new version is available you might have to visit the official download page on concrete5.org.
Normally you would navigate to your dashboard page dashboard/system/update/update or alternatively, type “update” in your intelligent search box and click on “Update concrete5”. Then from there, you’d click on the button labeled “Check For Updates.”
If it’s not working you’ll have to visit concrete5's official download page, download the new version, and follow this tutorial to update concrete5 manually—under “Manual Dashboard Update.”
Where to go from here
Like it says in the title, these are easy ways to harden security in concrete CMS. Now if you’re the technical type and want to go all the way, the core team has provided a configuration best practice list to ensure your website is as secure as they go.
Concrete’s marketplace also offers a few packages that can help you with some specific security-related tasks.
- Restrict login: This plugin allows you to specify one or more IP addresses from which authentication is permitted. Use this plugin if you only have a small group of registered members on your website
- Login Alert: Be alerted by email when someone logs in to your site. Mostly useful to protect the SuperUser account
- HTTP Headers: This plugin focuses on setting security-related HTTP headers. This is for advanced users!
- Intrusion Detection System: this plugin protects your site against common cyber-attacks like SQL Injection, XSS attacks, and over 70 more. This is for advanced users as well!
- Two-Factor Login Security: with 2-Factor Authentication (2FA) protect all your critical accounts even if someone knows or steals your password. Full disclosure: I made this plugin. Feel free to try the demo